Wednesday, December 29, 2010

Using the "Leftover" Felt

 They don't call me The Trash to Treasure Teacher for nothing. . .

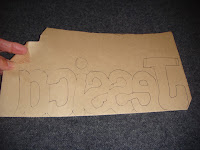
Here's a craft using the leftover pieces from cutting out the names of my grand daughters for the top of their dress-up boxes.

Any time you've used sticky back felt and have some scraps leftover, consider one of these activities:

1. Peel the pieces from the backing and adhere them to a piece of paper.
2. Turn the shapes into something by drawing and adding to them with a marker or crayons.

Or,

1. Look at the leftover shapes and decide if they remind you of something. If they do, arrange them in a way to develop a picture using the pieces.

2. Use marker or crayon to fill in the missing components to the picture.
On the first picture, the shapes made for a silly bunch of imaginary animals.

On the second picture, the one scrap piece looked a lot like a cap and one piece looked like a foot, another like small waves or sand peeks--and the one piece resembled a mustache. I put the pieces in place and then decided on the other features.

Monday, December 27, 2010

The Other Dress-up Box

 It was pointed out to me that I said "boxes" (plural) and only showed one dress-up box personalized top in my last post. Therefore, here is the other one. I chose a box with a rooster motif since this family raises chickens and roosters. The bright orange dress and the fact that I could cut out a photo to make it look like the child was actually standing on the rooster's back made for a very happy combination. I followed the same procedure as I'd outlines before, but this time had small sprays of glitter coming from Olivia's fingertips. Also, in order to enhance the box and add a bit more of the bright orange, I made hole punch dots from the dress of a second photograph I had of her in the same jumper. Then, I simply glued the dots at various points in clusters on the yellow background.

Sunday, December 26, 2010

Dress-up Boxes

The Christmas dress-up boxes for the grand daughters turned into a big hit this year. If you have a little princess who likes to dress up, you might want to start on this project early. It makes a great birthday or Christmas gift. For about six months I looked for items the girls would enjoy wearing. I stored them in my closet while I thought about the presentation. Since there are so many pretty covered boxes on the market, I simply waited until I found two I liked--and used a coupon to buy them at 40% off, of course. The next step was to personalize the prize.
1. 
2.

1. On the back (paper side) of a piece of sticky-backed felt, outline the child's name.

2. Cut out around the letters. (For stability, keep the letters connected.)  Bubble letters work well.
3
 
4

3. Slowly peel the back from the felt. 

4. Carefully place the sticky side on the box where you want it. (You only have one chance to get this right, the adhesive is pretty strong.)


5
5. Outline the letters in glitter
    glue. Allow to dry.

    6. To personalize the dress-up box even more, I chose a photo of the child, printed it out and sprayed it twice with a thin coat of hair spray. (Allowing it to dry between coats.) This gave the photo more durability. I carefully cut away all the excess from the photo and glued the child's picture to the top of the box. In this case, I chose a picture of the child in her Halloween costume and drew a wand in her hand. By adding a glitter starburst to the end of the wand, it appears she is adding the glitter to her name.
Inside the box she'll find (just to name a few things): silly sunglasses, tiaras, dress-up clothing, a boa, gloves, purses filled with necklaces and bracelets and tu-tus, of course.
6

Thursday, November 18, 2010

Back after a short break. . .


The new grandchild arrived and he's wonderful, so I've been busy. But, no matter how busy you are, there's always time for discovery. Recently I needed to make a "pin the tail on an animal" for our 2 yr. old grand daughter's Birthday. The animal was gray and I didn't have the correct color, but I did have a blue piece of poster board. I decided to do a sun bleach. Poster board is cheap, non-archival paper, so I knew it would bleach in the sun. I made an outline of the animal on a large sheet of paper, cut the animal out and lightly taped the outline down on the poster board. I put it out in the sun for a few hours. Ta-da! When I retrieved the poster board and removed the outline, I had a perfect, gray animal on the bright blue poster board which I went on to enhance with marker and paint.

This is a similar inexpensive and fun craft. Here's an easy way to do a sun bleach:

1. Get a sheet of construction paper and collect some items.
 2. Place the items on the paper and put it in the direct sunlight for several hours. (Use rolled tape pieces to hold the items in place if necessary.)


 3. Remove the items and see how the sun has bleached out the paper all around the items.

4. Outline the items if you wish.


Craft stores sell paper that is light sensitive and this process works faster using specialty paper, but any cheap construction paper will bleach out, so save the money. Try this fun project at home. Have fun!

Wednesday, October 6, 2010

Hole Punch Dot Fun

Crafting with young children is a lot of fun. Additionally, crafts are a great way to help little ones develop their fine motor skills. A fun, easy, creative and inexpensive craft idea is to make hole-punch dot pictures.

Simply provide a lot of hole-punch dots, glue and paper. (For younger children, put some glue in a jar lid and give them a cotton swab so that they can apply glue with more controlled dots.) [Note: Always cover a work area with newspaper.] Apply glue dots. Shake some hole-punch dots onto the paper and the glue will accept them. Or, ask the child to place hole-punch dots on the dots of glue, one by one.

Here are two examples of dots glued to paper. The one on the left shows glue and dots arranged to form a picture. The one beside it shows dots placed randomly on paper. For more ideas on using hole-punch dots, check out my book, Little Hands--Create! p. 10 "Hole-Punch Magic."(Williamson--an Ideals Publication.)


Now, let's store more dots to use another time. Using scraps of bright-colored paper, allow the child to practice using a hole-punch. Scoop up the punches and keep them for future projects. They can be kept in an envelope. But, why not store them in a way that shows the colors? I keep hole-punch dots in empty mint containers or in empty medicine bottles. (above, right) (I also keep the scraps that have holes in them. They look great in a collage.) Have fun!

Saturday, October 2, 2010

Fun with Snipper Critters


At the recent FRA conference, I presented a truncated version of my popular craft/subject coupling in two sessions—one for Pre-K and one for K-2nd. These sessions focused on how you can have students make easy, fun, crafts and integrate them with core disciplines. The idea: Why not combine learning with fun AND creativity? Here are just some of the skill activities we engaged in during the recent "Make and Take."

Snipper Critters (A versatile book waiting for your adaptations.)
 Sure, the over 80 'open-ended' critter patterns alone may be used to create individually designed animals for a lesson or unit.  A few of the critters are shown here. But, just as with all of my 'open-ended' patterns, that's not the end of it. 

Once the animal is cut out, keep an 'outlines file.' (Right) The normal 'throw-away' portion of Snipper Critters isn't trash at all—it is a treasure. Here are some of the uses.

(Left)The outline can be placed on a piece of acetate on the overhead for a brainstorming full-class participation lesson. Or, why not write a poem on the overhead? The helpful critter facts in the back of the book make this even easier for the teacher.
(Right) When students are done using the miniature example in the corner on each critter's page, it makes a delightful mini-puppet. Cut it out. Glue it to a craft stick. Students will be inspired to write their own mini plays for the critters. Or, students may glue an outline (put glue on printed side) to a contrasting piece of paper to make a book cover or poem frame. Several critters may be put together using a brass fastener. 

Here's a fun lesson for you to do that helps with motor skills, visualizing positive and negative space, and discovery.
Attach outline.

Snipper Critter Stenciling

1. Take an outline left over from cutting out a Snipper Critter.

2. Lightly attach the outline to a contrasting piece of paper using small rolled-tape pieces.
Bingo marker the exposed area.

3. Place the prepared stencil on a piece of newspaper to protect work surface.

4. Bingo-marker the exposed area. Allow to dry.

Remove stencil.

5. Once dry, carefully remove the outline stencil.


Some uses:


  • Use your stenciled critter as a book cover.
  • Write pertinent vocabulary words around the critter.
  • On the unpainted area, write facts about the critter. (Elicit student responses.)
  • Place an appropriate beginning sound letter on the critter. Look for and cut out (from old magazines) words matching the same beginning sound. Glue them on the space around the critter. 


Wednesday, September 29, 2010

Critique Group

Yesterday my critique group met. Anyone who is serious about writing should consider being in a critique group. It helps to have the insight of other writers who understand and respect your genre. By meeting regularly, you stay on track, edit your work in a timely fashion, and see your writing from different perspectives.

I'm blessed to be in a small group that really 'clicks.' I came home and couldn't wait to 'tweak' what we'd reviewed in the group. The suggestions and changes may have been small, but they were like the Little Bear's bowl of porridge--they were "just right."

The work I'm having critiqued is a chapter book (approximately for grades 4-6). This is the first one I've written for this age level. While I've finished an edited first draft, it's not really complete. Having several sets of eyes review and critique it has proven to be invaluable. It's coming along nicely. I hope to be able to send it out to a publisher in the next six months.