Tuesday, January 18, 2011

Repurposing Envelopes

Foil and envelopes have a lot of uses.
Brightly colored envelopes never get thrown away at my house until they have been "mined" for a few hearts. If the envelope has the added benefit of foil, that is saved too. A lot of hearts can be snipped by using the natural fold of the envelope as the center line.

These hearts are then deposited in a clear zip-type bag along with other hearts, from other envelopes, to be used as needed. The foil pieces too are folded and cut into hearts (or other shapes).

It doesn't take long to collect a lot of very colorful shapes. As Valentine's Day approaches, think of the fun children will have creating pictures and Valentine cards with all the bright--and shiny--hearts you've stored away in that zip bag.
Free-hand cut or trace and cut.
Soon you'll have lots of colors and sizes from very little material.
Cut out around your first cut, again and again.

Open them to reveal the hearts.

You might also try looping some of the open hearts together by cutting one heart and lacing it through another one. Then, tape the cut to close the heart again. Lace another and another in the same fashion. Soon you will have a lovely Valentine mobile.

One heart laced through another one.
Several laced together.

My "To and From" Tags for Next Year

Before
Had a chance to sit down and repurpose more of the Christmas cards. Thought I'd share the results to show a few more of the many cool "to and from" tags I'll now have for Christmas this year. It's fun to see what cool shapes and designs you can make from the cards. Next--the envelopes!
After

Sunday, January 16, 2011

Trash to Treasure "To and From" Tags

Christmas is over, the New Year has begun. Time to discard all those beautiful Christmas cards and greetings. Don't you just hate to throw away all that beautiful art work? Well, don't! Now is the time to make "to and from" tags from all those pretty cards.

 All you will need is the card fronts, scissors, a hole punch and string, ribbon or yarn.
1. Gather together the card fronts. 2. Cut the pictures, etc. into pleasing shapes. 3. Hole punch the new "To and From"card. 4. Lace yarn, string or ribbon through the hole. 5. Write To and From on the back or leave them blank. 6. Store them away for next Christmas--it will be here before you know it!

You may even want to store the cards in one of the pretty, colorful envelopes that housed one of the cards you received.
As you can see, sometimes you will be able to cut several tags from one card front.


I'm always pleased to have so many nice "To and From" tags ready for the next year. Also, this is a fun activity to do with children as they like to find the most pleasing part to cut out and keep.

Wednesday, December 29, 2010

Using the "Leftover" Felt

 They don't call me The Trash to Treasure Teacher for nothing. . .

Here's a craft using the leftover pieces from cutting out the names of my grand daughters for the top of their dress-up boxes.

Any time you've used sticky back felt and have some scraps leftover, consider one of these activities:

1. Peel the pieces from the backing and adhere them to a piece of paper.
2. Turn the shapes into something by drawing and adding to them with a marker or crayons.

Or,

1. Look at the leftover shapes and decide if they remind you of something. If they do, arrange them in a way to develop a picture using the pieces.

2. Use marker or crayon to fill in the missing components to the picture.
On the first picture, the shapes made for a silly bunch of imaginary animals.

On the second picture, the one scrap piece looked a lot like a cap and one piece looked like a foot, another like small waves or sand peeks--and the one piece resembled a mustache. I put the pieces in place and then decided on the other features.

Monday, December 27, 2010

The Other Dress-up Box

 It was pointed out to me that I said "boxes" (plural) and only showed one dress-up box personalized top in my last post. Therefore, here is the other one. I chose a box with a rooster motif since this family raises chickens and roosters. The bright orange dress and the fact that I could cut out a photo to make it look like the child was actually standing on the rooster's back made for a very happy combination. I followed the same procedure as I'd outlines before, but this time had small sprays of glitter coming from Olivia's fingertips. Also, in order to enhance the box and add a bit more of the bright orange, I made hole punch dots from the dress of a second photograph I had of her in the same jumper. Then, I simply glued the dots at various points in clusters on the yellow background.

Sunday, December 26, 2010

Dress-up Boxes

The Christmas dress-up boxes for the grand daughters turned into a big hit this year. If you have a little princess who likes to dress up, you might want to start on this project early. It makes a great birthday or Christmas gift. For about six months I looked for items the girls would enjoy wearing. I stored them in my closet while I thought about the presentation. Since there are so many pretty covered boxes on the market, I simply waited until I found two I liked--and used a coupon to buy them at 40% off, of course. The next step was to personalize the prize.
1. 
2.

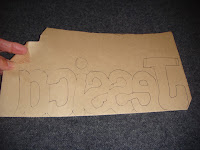
1. On the back (paper side) of a piece of sticky-backed felt, outline the child's name.

2. Cut out around the letters. (For stability, keep the letters connected.)  Bubble letters work well.
3
 
4

3. Slowly peel the back from the felt. 

4. Carefully place the sticky side on the box where you want it. (You only have one chance to get this right, the adhesive is pretty strong.)


5
5. Outline the letters in glitter
    glue. Allow to dry.

    6. To personalize the dress-up box even more, I chose a photo of the child, printed it out and sprayed it twice with a thin coat of hair spray. (Allowing it to dry between coats.) This gave the photo more durability. I carefully cut away all the excess from the photo and glued the child's picture to the top of the box. In this case, I chose a picture of the child in her Halloween costume and drew a wand in her hand. By adding a glitter starburst to the end of the wand, it appears she is adding the glitter to her name.
Inside the box she'll find (just to name a few things): silly sunglasses, tiaras, dress-up clothing, a boa, gloves, purses filled with necklaces and bracelets and tu-tus, of course.
6

Thursday, November 18, 2010

Back after a short break. . .


The new grandchild arrived and he's wonderful, so I've been busy. But, no matter how busy you are, there's always time for discovery. Recently I needed to make a "pin the tail on an animal" for our 2 yr. old grand daughter's Birthday. The animal was gray and I didn't have the correct color, but I did have a blue piece of poster board. I decided to do a sun bleach. Poster board is cheap, non-archival paper, so I knew it would bleach in the sun. I made an outline of the animal on a large sheet of paper, cut the animal out and lightly taped the outline down on the poster board. I put it out in the sun for a few hours. Ta-da! When I retrieved the poster board and removed the outline, I had a perfect, gray animal on the bright blue poster board which I went on to enhance with marker and paint.

This is a similar inexpensive and fun craft. Here's an easy way to do a sun bleach:

1. Get a sheet of construction paper and collect some items.
 2. Place the items on the paper and put it in the direct sunlight for several hours. (Use rolled tape pieces to hold the items in place if necessary.)


 3. Remove the items and see how the sun has bleached out the paper all around the items.

4. Outline the items if you wish.


Craft stores sell paper that is light sensitive and this process works faster using specialty paper, but any cheap construction paper will bleach out, so save the money. Try this fun project at home. Have fun!