Friday, January 24, 2014

Clean-Up Fun

Empty box-scissors, tape
(Markers, stickers, etc. as desired)
If you want your little ones to think that clean up is fun, all you have to do is turn an empty tissue box into a loud-mouthed monster who likes to eat trash! They will be eager to "feed the monster!"

Simply flatten the box by carefully tearing it open where it is glued. It is easier to decorate a flat surface. Also, this shows how it can be stored and stacked with your construction paper to be used again later.


You can make your monster any way you like, but I think it is especially cute to give a monster some funny hair that sticks straight up. I simply cut strips down on the flap that is above the "face" portion of the box. This can be curled, colored, beribboned, etc. to make your monster unique. If you are using a large, rectangular box without this "hair flap," you may want to add yarn hair, an antenna, a hat or something you think is funny. ANY tissue box will work with a little adaptation as long as the opening is the mouth.


Cut down on one flap to make "hair."
Add some facial features to you trash monster. 
I like to add funny eyes.  Plastic google-like eyes can be added, but a simple sticker-magic marker drawn eye will suffice. Let children be creative in making their monsters--the trash eating monster can be an arts and crafts activity in and of itself--and it's reusable.


Reshape the box and tape the side (which is now the bottom) so that it stays closed and sits on the craft area to "gobble up the trash" from an arts/crafts activity. Children love to take their monster to the trash can and empty out his mouth (or shake trash out of is head!). This activity makes clean up a fun activity.

Once the trash is emptied into the real trash can, the tape can be removed and the monster can be folded flat to be stored with other craft items. It can be used again and again.
Once the monster is done, it will be fun to feed it trash! 

Monday, January 13, 2014

Swords and Shields

      It was wonderful having the entire family here for Christmas. Once Christmas was over and all the decorations were put away, it was time for me to get "back in the groove" and start sending my weekly fun letters to the "long-distance" grands who had returned to Texas. I knew they'd enjoy this activity.
      When everyone was here we had a lot of vegetables and that meant opening some canned good. Since I buy a lot of groceries in bulk, the cans come in 6 or 8-pks and there is a nice curved-rectangular piece of cardboard at the bottom holding the cans. I put a stack of the cardboards aside just for this activity.

Cardboard from canned good.
For the sword, fold a piece of paper (approximately as long and wide as the cardboard) and cut out one-half of a sword shape, open the shape and trace the entire outline onto one of the cardboard pieces. Cut the sword out with a craft knife or scissors. (An adult should do the cutting.)
Make one-half the shape.

Trace the sword shape onto one cardboard.

Make one for everybody! 

Mark and cut two "straps" on the second cardboard.
Make a shield with a second cardboard. A child's small arm will easily slip into the two  "straps" so the child can hold the sword in one hand and the shield in the other.
I like to put the child's name or initial on the shield. They like to color and decorate the sword and shield.
Remind the little ones that these are for playing and dress-up and not for being too rough!

Thursday, November 14, 2013

Rudolph, the Red Nosed Reindeer

Palm "boot" piece, bow, eyes.
 When we lived in the panhandle of Florida, a parent of one of my kindergarteners presented me with the cutest "Rudolph" for a Christmas present. He had taken a "boot" from a palm tree, cleaned it, applied a clear varnish and added a bow and eyes--and of course, a cute nose.  When I went to hang "Rudolph" last year I realized the original bow, eyes and nose no longer looked very good. Still,  the tree piece was in great shape.  I removed the yellowing eyes, the crumpled and faded bow and the sad looking nose.
Hot glue bow, eyes and a nose.
The new, crisp bow just below the "antlers" part of the palm piece is now bright red (and made from outdoor, colorfast ribbon).The eyes are large, shiny "google" eyes and the new nose is a bright red. The transformation simply took some fresh ribbon, craft "google"eyes and a puffy craft ball and some hot glue to keep it all in place.

The old Rudolph is recycle, refurbished and renewed and . . . the handsome new Rudolph is ready to hang on a wreath on our front door.

Rudolph, the Red Nosed Reindeer

Thursday, September 19, 2013

Tag-It People! 

Bread, fruit, or veggie bag closure tags have an interesting flat shape. They are easy to come by and make cute little "Tag-it People." The best part is--they're free! Collect some tags and get some fine-tipped permanent markers. The tag points can be used as the "legs" of the Tag-it. Or, turn it upside-down and make the tag points look like pulled up pigtails. Look at some of the examples on the green board below and come up with some interesting Tag-its of your own. Tag-its are cute and positive little people you can use to "tag" someone and show them you care. Because of their shape, Tag-its will hook onto the bottom of a T-shirt, a belt loop or edge of a garment.
1. Most tags are plain. This one had a
paper attachment so I used it. 

2. Color both sides of the paper .

3. Cut the strip from edge to tag.

4. Add details to the tag to make a Tag-it Person.

5. Curl the strips to make "hair."

6. Just a few of my collection of Tag-its along with plain ones ready to be inked. 
Tag-its are not intended for small children. Keep small items like this away from children under 3 yrs. of age. 

If you create an especially cute Tag-it, please send it to my blog so that I can post it. 

Thursday, July 4, 2013

Mini Picture Frames

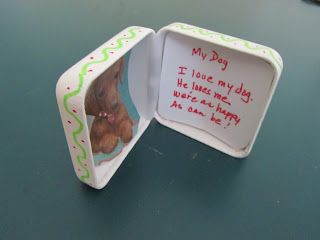
Recently I received a piece of jewelry and hated to think of throwing away the cute little hinged box it came in. (Okay, I have "recycling" in my blood. It must be part of my DNA. I don't like to throw things away--especially if I can find another way to repurpose them.)

Anyway, I turned the hinged box over in my hand a few times and then realized that when it sat sideways it looked like a little picture frame. I removed the inside silky lining and cut a picture to fit in one side and made up a little verse for the other side. Of course, two pictures inside would have been nice too. Once the box is turned over on its side, it sits nicely on a flat surface. Kiddos will especially like that the box can close on its hinge and hide the picture(s) inside. That makes for even more fun. Decorate the outside with markers, or glue on plastic "gems" or foamy pieces to make the picture frame unique.

Wednesday, May 1, 2013

Time Capsule News


There are a lot of fun and historical things happening around the state of Florida in celebration of our 500 Birthday. 

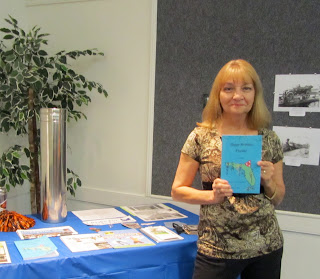
My book, Happy Birthday, Florida! (1513-2013) was honored recently with inclusion in the time capsule event at the Seminole County Public Library System, East Branch. I was able to read a poem, "Florida's Name" from the book.  Now, if I can just live long enough to be at the "unearthing" in 50 years! 


Friday, February 15, 2013

Newest Book

It's here! I finished Happy Birthday, Florida! in time to have it available for the many festivities happening in and around the state as it celebrates its 500 "birthday."

When Ponce de Leon arrived and called the lovely land "La Florida" he was referring, no doubt, to the budding spring that surrounded him and his crew.

As the ending of "Florida's Name" states:

It's good he came in springtime
And not during torrential rain,
Or else our lovely Florida
Might have been named--
    "La Hurricane."

This book is loaded with zany and thought-provoking poems intended for the 3rd gr. to middle-school audience. But, as always, adults tell me they love the poems as much as the kids.
Happy Birthday, Florida!
1513-2013